Quantcast
Channel: Tiny Devices
Viewing all 72 articles
Browse latest View live

I.MX6 GK802/Hi802 - A working Kernel with Ubuntu

$
0
0
The Hi802/GK802 mini-pcs are interesting devices because of the vast reference documentation available for the IMX6Q processor. Freescale are also providing a HDMI TV Dongle reference design complete with source code, the Hi802/GK802 are partially based on this design. With this is mind and after spending many hours decoding the pcb layout coupled with bouts of head scratching, I finally got a kernel booting ubuntu. This is a work in progress but hopefully will kick start further development by community see here. Considering this is work in progress you definitely require serial console access if booting fails. Furthermore I'm testing on a GK802 with 1.2 CPU version therefore no guarantee on a 1.1 CPU which I think are GEN 1 or for Hi802 devices.


1. Kernel Boots from SD card.
2. USB port functions with USB hub (for me works with keyboard and mouse).
3. Serial console shell active.
4. HDMI output is set to 1280x720@60.
5. Ubuntu Desktop launches but freezes randomly :(. Not that use-able in its current state.
6. No wifi or bluetooth. Wifi shouldn't be too hard to add.

So if your keen or want to help out, instructions below, I assuming you know how to use git and have armel compiler (I use arm-linux-gnueabi-) :

1. Check out the Freescale imx6 kernel tree and checkout imx_3.0.35_1.1.0. I found 1.1.0 to be more stabe than the 2012-09-01 branch.

    cd linux-2.6-imx
    git checkout imx_3.0.35_1.1.0
          
2. Down this tar file containing patches and kernel config (thanks to miniand.com for provding hosting). Extract and apply patches

    git apply gk802_patch_1.patch
    git apply gk802_patch_2.patch

3. Make kernel config

    make ARCH=arm imx6_defconfig
    make ARCH=arm menuconfig
        
4. Copy the file kernel_config to .config 

    cp kernel_config .config

5. Build the kernel and modules

    make ARCH=arm CROSS_COMPILE=arm-linux-gnueabi- uImage
    make ARCH=arm CROSS_COMPILE=arm-linux-gnueabi- INSTALL_MOD_PATH=output      modules     
    make ARCH=arm CROSS_COMPILE=arm-linux-gnueabi- INSTALL_MOD_PATH=output modules_install

6. Download the rootfs L3.0.35_1.1.0_UBUNTU_RFS from the freescale website. You may need to create an account to access to the files.

7. To create a bootable SD card, I took the bare ubuntu image from here (thanks ArmTvTech.com and   dylandn ) and dd'd this to the card. I then reformated the ext4 partition and untar'd the rootfs 
L3.0.35_1.1.0_UBUNTU_RFS to it.

8. Next step is to copy the new kernel and modules over:

    sudo dd if=arch/arm/boot/uImage of=/dev/<device> bs=1048576 seek=1 && sudo sync

    sudo cp -r output/lib/modules/3.0.35-05236-gc9dfae3-dirty /media/ubuntu/lib/modules


9. Now try to boot, fingers crossed you should see the kernel trace output appearing and finally a command shell in the serial console.

generic-usb 0003:413C:2107.0002: input,hidraw1: USB HID v1.10 Keyboard [Dell Dell USB Entry Keyboard] on usb-fsl-ehci.0-1.4/input0
EXT4-fs (mmcblk0p1): couldn't mount as ext3 due to feature incompatibilities
EXT4-fs (mmcblk0p1): couldn't mount as ext2 due to feature incompatibilities
EXT4-fs (mmcblk0p1): mounted filesystem with ordered data mode. Opts: (null)
VFS: Mounted root (ext4 filesystem) on device 179:1.
Freeing init memory: 184K
 * Starting mDNS/DNS-SD daemon[ OK ]
 * Starting load fallback graphics devices[ OK ]
 * Starting Userspace bootsplash[ OK ]
 * Stopping load fallback graphics devices[ OK ]
 * Starting configure network device security[ OK ]
 * Starting Mount network filesystems[ OK ]
 * Starting Upstart job to start rpcbind on boot only[ OK ]
 * Stopping Upstart job to start rpcbind on boot only[ OK ]
 * Starting network connection manager[ OK ]
 * Stopping Mount network filesystems[ OK ]
 * Starting Failsafe Boot Delay[ OK ]
 * Stopping Failsafe Boot Delay[ OK ]
 * Starting System V initialisation compatibility[ OK ]
 * Starting configure network device[ OK ]
 * Starting Bridge socket events into upstart[ OK ]
 * Starting RPC portmapper replacement[ OK ]
 * Starting Start this job to wait until rpcbind is started or fails to start[ OK ]
 * Stopping rpcsec_gss daemon[ OK ]
 * Stopping Start this job to wait until rpcbind is started or fails to start[ OK ]

[ OK ]rting Advanced Power Management daemon...        
Last login: Thu Jan  1 00:00:41 UTC 1970 on tty1
speech-dispatcher disabled; edit /etc/default/speech-dispatcher
Checking for running unattended-upgrades: 
[ OK ]rting bluetooth        
 * PulseAudio configured for per-user sessions
saned disabled; edit /etc/default/saned
 1 Jan 01:36:59 ntpdate[5241]: no servers can be used, exiting
Welcome to Linaro 11.10 (development branch) (GNU/Linux 3.0.35-02666-gc27cb38-dirty armv7l)

 * Documentation:  https://wiki.linaro.org/

301 packages can be updated.
53 updates are security updates.

New release '12.04 LTS' available.
Run 'do-release-upgrade' to upgrade to it.

root@linaro-ubuntu-desktop:~# 


10. Your HDMI display should show a Ubuntu desktop after a while. If the desktop appears then try launching a terminal window which should appear without it freezing. Once the deskop freezes it can be recovered in the serial console shell by:

    service lightdm stop
    service lightdm start

Xorg is reporting the following error when frozen:

[    71.433] (II) XKB: reuse xkmfile /var/lib/xkb/server-A77BBE312A49C9FE89948D38B2A8CB84C3CBB410.xkm
[   101.398] (II) XKB: reuse xkmfile /var/lib/xkb/server-A77BBE312A49C9FE89948D38B2A8CB84C3CBB410.xkm
[   181.556] [mi] EQ overflowing. The server is probably stuck in an infinite loop.
GK802 - Ubuntu Update 1 (GPU/VPU Acceleration)

$
0
0
Since my last post, we have made rapid progress in getting a functional kernel working on the GK802. This couldn't have been done without the invaluable contributions from rz2k (aka Dmitriy ) and abrasive (aka James Laird)  on the irc channel imx-dongle. Coupled with countless hours from myself the progress so far:

1. Wifi working.
2. External SD working
3. Matched IOMUX configuration to align with the Android image. Managed to work out how compile        C programs to run under the Android image.
4. Stripped out unnecessary device initialisation from the original HDMI dongle source.
5. Enabled EGL and GLES HW Acceleration in Ubuntu (big thanks r2zk).
6. Unity desktop I think is partially HW accelerated.

I plan to push kernel patches in the coming days. There is still a fair amount of work to do due to  thermal/CPU freq driver patches in the kernel and lack of PMIC on the GK802

Update: Changes are now merged into the main repo https://github.com/imx6-dongle/linux-imx. If you want to build the kernel then use imx6_gk802_defconfig.

Here's a video to demonstrate what's been achieved and how capable the IMX6Q is. In the video Firefox seems sluggish, however this is easily compensated by the fact I run glmark-es2 whilst simultaneously playing a 720p video. 


Compared to the Chinese SOC manufactures it is miles ahead in the availability of reference documentation and Linux support. The video playback is pretty impressive and I hope that we will see XBMC development commence at some point.


GK802 - Ubuntu oneiric preview image

$
0
0

For those of you waiting for a pre-built image, here goes!

If you want to find out more about our development efforts or want to contribute 

1. irc channel  #imx6-dongle on freenode
2. Kernel/Uboot Source 
3. Wiki Page
4. Google Group

I've called this a preview image because it's still work in progress. What's working:

1. New uboot - based on abrasive's (aka James Laids) excellent work.
2. GPU and VPU h/w acceleration
3. Working wifi (although performance can be below par)
4. Working internal/external SD slots.
5. Working usb ports.

Instructions:

1. Download image (thanks to miniand.com for hosting).

2. Unzip image and dd to an SD card. This image is for a 8GB SD card, however the ext4 file partition is only 3GB therefore should work on a 4GB card. Fix the partition (by expanding it) after completing the dd.

3. Download a new uboot and 'dd' to your sd card (replace <drive> with the correct value):

    sudo dd if=u-boot.imx bs=1k seek=1 of=/dev/<drive> && sync

4. Place image in the internal sd card slot and fingers crossed it should boot (useful to have a serial console open). The image defaults to 1280x720 screen resolution, once the desktop appears, plug-in a keboard/mouse via the usb port.

5. Next configure wifi, and it may be useful to reboot after setting wifi so that the correct time is picked up.

6. Then enjoy the desktop experience!

Unfortunately shutting down from the desktop just takes you back to the logon screen. To force a  proper shut down open a command shell and issue "sudo shutdown -P now", wait a minute or so to ensure shut down is complete and then remove the usb power cable.

To verify GPU acceleration you can run glmark2-es or es2gears. To verfiy VPU run totem with a file of your choice.

I.MX6 GK802 - Ubuntu 12.04 preview image

$
0
0
Following on from the oneiric preview image, I've put together a rootfs based on Linaro 12.04. Thanks to the Otavio from the yocto project for help building the gpu drivers. It should be possible to deploy the rootfs on other imx6 devices by deploying the correct uboot, kernel + modules.

Note: updated rootfs has working VPU.

What's working :

1. GPU + VPU acceleration.
2. Wifi
3. Choice of Unity 2D or Xubuntu desktop
4. Chromium
5. glxgears/glmark2-es2/es2gears working in Unity 2D and Xubuntu.

What's currently not working:

1. Bluetooth
2. Pre-installed Neverball (3D ball game) - broken something


If you prefer not to follow the manual instructions listed below user hste (aka
Haakon Stende
) on freenode imx6dongle has created a script to build and deploy. Script is here, any problems contact hste on freenode for advice.

To install (assuming oneiric image already on sd card):

1. Download rootfs linaro_12_04_gpu_vpu.tar.gz. Thanks to hste for hosting.
2. Delete existing rootfs from oneiric image (this is the "ubuntu" partition on the SD card).
 
    rm -rf <sd card mount point>/ubuntu/*
    sync

3. Extract new rootfs:

    cd <sd card mount point>/ubuntu
    tar xvf linaro_12_04_gpu.tar.gz
    sync

4.  Download kernel with cpu frequency or without (requires a good heatsink) and 'dd' to sd card.

    dd if=arch/arm/boot/uImage_cpufreq of=/dev/sdc bs=1048576 seek=1 && sudo sync 

         OR


    dd if=arch/arm/boot/uImage_no_cpufreq of=/dev/sdc bs=1048576 seek=1 && sudo sync 

5. Download uboot and 'dd' to sd card.
    dd if=u-boot.imx bs=1k seek=1 of=/dev/sdc && sync


4. Remove SD card and place in internal SD slot and power up.

I.MX6 GK802 Xubuntu 12.04

$
0
0
This is an attempt at producing at fast and lightweight desktop release based upon xfce. Given that the majority of the Debian based ARM desktop distros still rely on Open GL Window Managers, the desktop makes use of the Open GL Vivante library where possible. However as the Vivante libraries don't seem to support all the mesa-gl api's this works with limited success.

Ideally the next step would be to rework/recompile some of the applications to use GLES instead of Open GL or find desktop with GLES support.

Given this is a rootfs, it can be tested on other imx6 devices but no guarantees.

What is working:

1. GPU acceleration
2. Video playback using totem
3. Chromium (with GPU acceleration, webgl does not work)
4. Numerous desktop applications
5. Wifi

As per the previous ubuntu 12.04 image, to deploy:

1. Download roofs.

2. Extract rootfs onto your sdcard.


There is a bug in ubuntu with dbus disabling wifi (http://bugs.debian.org/cgi-bin/bugreport.cgi?bug=659953). After booting execute the following and reboot to configure wifi from within xfce:

chgrp messagebus /usr/lib/dbus-1.0/dbus-daemon-launch-helper
chmod +s /usr/lib/dbus-1.0/dbus-daemon-launch-helper 


You can also download the Vivante GPU demos, these demonstrate the performance of the GC2000 core. Extract the tar file and the samples are in located in "viv_samples/vdk", there are number  tutorial files that you can run eg "tutorial1, tutorial1_es20".

I.MX6 GK802 - Uboot multi-boot

$
0
0
I spent some re-factoring the current uboot to enable the possibility of booting a roofs located on either:

1. Internal SD
2. External SD
3. Usb drive

Here's how it works, the new boot searches for a uboot script file called "boot.scr" on each of the above devices. The boot.scr is loaded and executed from the first device it encounters containing the file. We assume the device contains an ext2/3/4 partition and the boot.scr is located in /. Within the boot.scr file the variable 'boot_normal' has to be set to contain the uboot commands to run next, the contents of this variable are then executed.

You can download multi-uboot from here and 'dd' to an sd card that will reside in the internal sd card slot. Potentially this can be a very small SD card if you have no intentions of hosting a rootfs on it.

sudo dd if=u-boot_multi_boot.imx bs=1k seek=1 of=/dev/<internal SD card device> && sync


Lets start with an example, lets say we want to execute our ubuntu image from the external SD card. I am assuming the ubuntu rootfs exists on an sd card . First we create a text file I call them 'boot.cmd' (you can give it any name) containing the uboot commands to run as shown below:

setenv root '/dev/mmcblk1p1 rootwait'
setenv rootfstype 'ext4'
setenv kernel 'uImage'
setenv video 'mxcfb0:dev=hdmi,1280x720M@60,if=RGB24'
setenv extra ''
setenv boot_normal 'setenv bootargs console=${console} root=${root} rootfstype=${rootfstype} video=${video} ${extra};  mmc dev 1; e\
xt2load mmc 1:1 0x10800000 /boot/uImage; bootm'

For the above :

1. 'root' is set to the external sd card (/dev/mmcblk1p1).
2. 'video' contains the video resolution we want the kernel to set. Note setting the resolution may disable sound. So you could remove the video variable from the file to let the kernel detect the resolution using EDID.
3. 'boot_normal' is told to use the external sd slot by  'mmc dev 1' and then to load the kernel located at /boot/uImage.

Next the text file has to be converted to a uboot script image file using the mkimage command to create  the boot.scr file.

mkimage -A arm -O linux -T script -n "boot" -d boot.cmd boot.scr


Copy the boot.src to the root directory of your external sd card containing the rootfs.

Ensure internal sd slot has a the sd card containing the mutli-boot uboot on in it and does not contain a /boot.scr. Place the sd card containing the rootfs in the external sd card slot and boot.

Here are some example script files (remember to rename compiled file to boot.scr) :

1. Boot from external SD (no video set)


2. Boot from from USB (assumes a single mass storage device is available).

3. Boot from internal SD (no video set)

Mixtile - Exynos 4412 Development Board

$
0
0
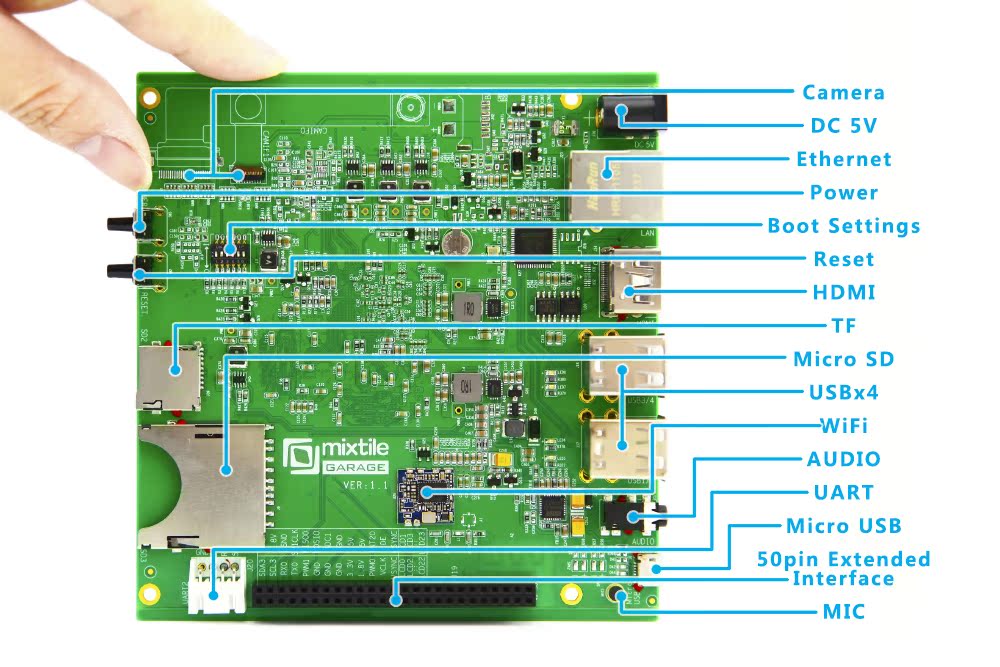
As most of you are aware there are plenty of ARM development boards to choose from, well here is a another one to add to the growing list. It's known as Mixtile (Chinese name: m too)  and is promoted as a low cost Quad Core board deploying Samung's Exynos 4412 (1.4GHz) processor accompanied with 1GB RAM, all for $79 (excluding shipping). It originates from China and surprisingly the schematics are freely available.

The board itself is large (12cm x 12cm) and I guess similarities would be drawn against Hardkernels older offerings namely ORDROID-U/X. The major differentiator is the plethora of on-board ports and I/O:

Sadly there's no SATA port but the 50 pin dual header (2.54mm)  supports I2C, SPI, ADC, PWM, Serial and I think an LCD interface (haven't verified these are working). The downside is that the I/O is probably 1.8v and sourcing a 3.3v/5v level shifter may not be easy. Furthermore what's unclear is how well these interfaces are supported in the kernel source. The 2.54mm pitch is ideal because the connectors are cheap and readily available. Quite a few of the peripheral ports (wifi, ethernet, SD cards, usb) are driven from 2 USB controllers, a SMC USB4640 and a LAN9514. It will be interesting to see if there are noticeable bottlenecks as the controllers are daisy chained. Audio support is provided by a WM8960, with the board providing a headphone jack and on board microphone. There are also solder pads for connecting a pair of speakers, the WM8960 datasheet indicates 1Watt output.

The board requires a 5v power supply and protection is provided by an on board fuse. By default the board boots from the micro sd slot, apparently it is possible to reconfigure the boot device through DIP switches although I couldn't find any documentation describing the settings. Although not obvious there are a number of LED's populated on both the front and back of the PCB. Once the board is powered 4 bright green LED light up indicating the 4 USB ports are powered. I have no idea of their relevance, however they are an irritation giving the level of brightness emitted. I also noticed some LEDs  on the underside of the PCB, again I can't see the purpose as that part of the board is not directly visible.


Another oddity is the location of the 4412 processor, its on the back of the PCB. Giving that the processor probably requires some level of cooling, it would indicate the PCB should be mounted using spacers/pillar so that air can flow to the underside of the PCB. Therefore it is advisable to have some pcb spacers handy if your planning to purchase. Fortunately I located some spare brass hex pillars that matched the mounting holes. I suspect the processor will also require some kind of passive cooling although there are no mounting holes or points to affix one.


To access the serial console you require a USB to TTL Serial Adapter which supports 1.8v these can be difficult to source and expensive.

Currently there is pre-view Android and Ubuntu (no h/w acceleration) images available for download, along with uboot and kernel source. I gave the ubuntu image a quick test, however to do so I needed to set the HDMI resolution to 720P, by default it is set to 1080P in the kernel.

As a quick workaround to set 720p I changed the following line in drivers/media/video/exynos/tv/hdmi_drv.c .

#define HDMI_DEFAULT_PRESET V4L2_DV_1080P60                                                                  

to
                    
#define HDMI_DEFAULT_PRESET V4L2_DV_720P60

To compile the kernel for ubuntu, you need Sourcery G++ Lite  I used  2010.09-50 v4.5.1. 

To compile the kernel:

make ARCH=arm CROSS_COMPILE=arm-none-linux-gnueabi- mixtile_garage_ubuntu_defconfig

make ARCH=arm CROSS_COMPILE=arm-none-linux-gnueabi- menuconfig

make ARCH=arm CROSS_COMPILE=arm-none-linux-gnueabi-

make ARCH=arm CROSS_COMPILE=arm-none-linux-gnueabi- modules INSTALL_MOD_PATH=output

make ARCH=arm CROSS_COMPILE=arm-none-linux-gnueabi- modules_install INSTALL_MOD_PATH=output

To copy the kernel to the ubuntu SD card image (where <drive> is SD card device):

sudo dd if=arch/arm/boot/zImage of=/dev/<drive> bs=512 seek=6144; sync;

To copy the kernel modules, you would do something like this, where <mount path> is the path to SD card rootfs :

sudo cp -r output/lib/modules/3.0.15 /<mount path>/lib/module

The user and password for the ubuntu image is 'ubuntu'. The preview ubuntu image has a default Locale of Chinese, to change this edit /etc/default/locale. You also need to change the Language settings from within the Unity desktop. Select Settings->Language Support.

I did test a HDMI to VGA adapter at 720p and it ran fine against my monitor.

Given this is a fairly new board (albeit using an older processor), there seems to be little support available at present which can make it daunting and challenging at the same time.

I.MX6 - Ubuntu 13.04 with GPU acceleration

$
0
0
One of the main drawbacks with the existing freescale BSP releases (up to 4.1.0) was the lack of support beyond xorg-server version 11. This was due to lack of support within the Vivante GPU libraries. With the introduction of a new BSP based on kernel 3.5.7,  it is finally possible to build support for xorg-server beyond version 11. The added bonus is support for armhf, however this is offset by the fact that the Vivante libraries are currently marked as alpha.


I've put together a preview Xubuntu Raring (13.04) rootfs to demonstrate this, 13.04 is based on xorg-server 13.3. Sadly there no video acceleration, this is work in progress, the major hurdle is that existing fsl gstreamer plugins are coded against 0.10 and there are compatibility issues with a later GLib version. The short video above gives an indication of how the libraries performs (video shows running  glmark2-es2,  vivante sdk sample and the 3D game Neverball at 720p). Note, not all OpenGL applications (eg FireFox) are compatible with the Vivante libraries because of limited API.

The rootfs has been updated to use the latest Vivante libraries producing better performance figures for OpenGL.

The origins of my rootfs is this minimal console rootfs  which I think was put together by Robert Nelson (this has no GPU/VPU support). My rootfs is fairly clean, sanitised and contains a minimal xbuntu installation. The intention was include just enough to get an accelerated desktop functioning and for the rest to be customised depending on the target device.

Another goal was to make the rootfs available to be deployable to any i.mx6 device. It should be possible to deploy this to any i.mx6 device (eg boundarydevices, wandboard, utilite, udoo, cubox-i) assuming it contains a dual or quad processor. By the way I don't own any of the mentioned devices but glad to accept hardware donations. All you require is a working uboot and kernel (4.1.0) or (3.5.7). I haven't tested again a 3.5.7 kernel, furthermore it may be possible to run against a later kernel again not tested. If you plan to derive a new rootfs from mine, please acknowledge the author.

Extract the rootfs to your designated media and copy your kernel and modules as required. The rootfs is configured to output to the serial console with auto-logon for root. By default the image boots to display a console logon prompt, if hdmi is configured. The user and password are 'ubuntu'.

Xfce4 is not configured to auto start, you can start it by:

service lightdm start

If you require auto start, remove lightdm override:

rm /etc/init/lightdm.override

You will need to configure networking as per your requirements. I decided not to install network-manager due the dependencies on gnome. You may need to edit the nameserver entry in /etc/resolvconf/resolv.conf.d/tail .

The mesa utilities glxgears,es2gears, glmark2, glmark2-es2 are pre-installed. glmark2 will end after the jellyfish demo with a segmentation fault.

The Vivante samples are located in /root/gpu-viv-bin-mx6q-3.10.9-1.0.0-hfp/opt/viv_samples.

If your deployment fails to run X, then my next post has some debugging steps. Also available to answer questions  IRC Freenode #imx6-dongle


I.MX6 Ubuntu 13.04 Debugging GPU Acceleration

$
0
0
You've probably reached here because your having problems getting the rootfs in my previous post to work for X11. So here some debugging tips to help you out:

1. The kernel I used is 4.1.0  and can be found in my repo and is a branch of the FSL repo. An additional patch to set the correct busid for the vivante driver may need to be made if not present in the kernel:

--- a/drivers/gpu/drm/vivante/vivante_drv.c
+++ b/drivers/gpu/drm/vivante/vivante_drv.c
@@ -55,7 +55,7 @@

#include "drm_pciids.h"

-static char platformdevicename[] = "Vivante GCCore";
+static char platformdevicename[] = "Vivante GCCore:00";
static struct platform_device *pplatformdev;

static struct drm_driver driver = {

Here is my  defconfig (I'm compiling for a custom board). Note: the FSL patch (ENGR00264288-1) to upgrade the Vivante libraries to 4.6.9p12.

2. Once you have a booting kernel, you should first test that kernel works against the Vivante framebuffer libraries. To do this we simply switch to the fb libraries (need to be root):

cd /usr/lib
rm libEGL.so.1.0 libEGL.so.1 libEGL.so
ln -s libEGL-fb.so libEGL.so.1.0
ln -s libEGL-fb.so libEGL.so.1
ln -s libEGL-fb.so libEGL.so 

rm libGAL.so
ln -s libGAL-fb.so libGAL.so

rm libVIVANTE.so 
ln -s libVIVANTE-fb.so libVIVANTE.so 

Now test with one of the Vivante tutorial examples (pick any of the tutorials)

cd /root/gpu-viv-bin-mx6q-3.5.7-1.0.0-alpha.2-hfp/opt/viv_samples/vdk
./tutorial7

If the tutorial doesn't run it may indicate there is a mismatch between the kernel Vivante code and the libraries or the Vivante libraries may be missing a dependency.

3. If everything is fine with the framebuffer libraries we can now switch back to x11:

cd /usr/lib

rm libEGL.so.1.0 libEGL.so.1 libEGL.so
ln -s libEGL-x11.so libEGL.so.1.0
ln -s libEGL-x11.so libEGL.so.1
ln -s libEGL-x11.so libEGL.so 

rm libGAL.so
ln -s libGAL-x11.so libGAL.so

rm libVIVANTE.so 
ln -s libVIVANTE-x11.so libVIVANTE.so 

Now reboot.

4. Before we test with X, we need to check that kernel vivante/drm modules are loaded:

root@ubuntu-imx6:~# lsmod
Module                  Size  Used by
vivante                  947  1 
drm                   137567  2 vivante

If the modules aren't loaded then X will revert to software rendering because the device /dev/dri/card0 does not exist. The loading of the module is configured in /etc/modules

5. I suggest starting a simple X server to test that the Vivante drivers get correctly loaded:

startx &

The output of the /var/log/Xorg.0.log should be similar to this. If errors are reported it may be because:

1. The vivante kernel module didn't load
2. Check the exa driver is present /usr/lib/xorg/modules/drivers/vivante_drv.so
3. Least likely, missing permissions on the gpu device, these should be setup in  /etc/udev/rules.d/10-imx.rules.

6. Validate the output of glxinfo and es2_info (they should show the presence of the Vivante drivers):

export DISPLAY=:0
glxinfo
es2_info

If you are not seeing "OpenGL renderer string: GC2000 Graphics Engine" and/or "EGL_VENDOR = Vivante Corporation" in the output then it may be possible that the mesa libraries are being picked up. If the directories /usr/lib/arm-linux-gnueabihf/mesa and/or /usr/lib/arm-linux-gnueabihf/mesa-egl are present then move these to another location. They shouldn't be present on my rootfs unless the mesa packages were reinstalled.


I.MX6 Debian Jessie (GPU/VPU) 3.10.9-1.0.0

$
0
0
Following on from the Xubuntu 13.04 rootfs which previewed GPU acceleration beyond Xorg 11, here is a Debian Jessie/Sid rootfs which has support for both GPU and VPU acceleration using the alpha 3.10.9-1.0.0 FSL (freescale) libraries. This armhf rootfs fires up a xfce desktop and has been validated against a 3.0.35-4.1.0 kernel.


Given the fact the 3.10.9-1.0.0 libraries are in an alpha this rootfs should also be treated as alpha quality i.e not everything you expect to work does! Another important point to mention is gstreamer support,  the existing VPU libraries make use of plugins for gstreamer 0.10 while Jessie has moved onto gstreamer 1.0 and currently it is not clear how/if Freescale will address this.  There is a 1.0 plugin that Carlos has bravely been working towards which I have included in the build again treat this as alpha quality. Give the state of the gstreamer plugins I haven't found an easily way to add support for totem or parole.

As per my previous releases this rootfs should run on most imx6d/q devices given a valid uboot and kernel (at least 4.1.0) , see my previous blog for the vivante patch. In order to reduce the image size, this is a minimal rootfs with just a few basic xfce/lxde applications installed (no browser). You can revert to a console boot if xfce/lxde is not required, see later part of the instructions below.

I have tested this rootfs on a Utilite Pro using this kernel and on a UDOO using this kernel. Many thanks to hste (aka Haakon Stende) for sanity testing on his GK802 and hosting my files. Courtesy of hste you also have the option of a lxde rootfs.

  • Additional instructions for UDOO can be found here along a SD card image. Furthermore I have verified that is possible to run the UDOO Arduino IDE on this rootfs. Albeit it requires a few changes to be make the IDE launch and compile, instructions are provided in the link.
  • For cubox-i Rabeeh has created a SD card image see here.
  • For all other devices use the instructions below:

1. Download the rootfs xfce or lxde and extract onto your media (for lxde see comments for tar command).

2. If you require serial console output then edit /etc/inittab and include an additional line at the end of the file for tty output as below, replacing <ttymxc> with  the correct serial port for your device. For example for UDOO it is ttymxc1 and for Utilite it is ttymxc3

    T0:23:respawn:/sbin/getty -L <ttymxc> 115200

3. By default no networking is configured, you will need to setup networking access as per your requirements. If you have ethernet then you can run  'dhclient eth0'.

4. On a successful boot you should be presented with the lightdm greeter logon screen. The default user is 'debian' and matching password.

5.  To test GPU acceleration open a terminal and run glxgear, es2gear, glmark2 and glmarks2-es2. Given the limited Open GL support provided by the Vivante libraries don't expect all applications to use GPU acceleration.

6. To test VPU support using the gstreamer0.10 plugins you can either:

  • Run gplay with a media file. The main drawback is there is no playback controls to pause/stop/forward/rewind video.
  • Thanks to the ingenuity of htse, I have included the video player from a yocto build which provides file selection and playback controls. To launch:
            video-player.sh

Note: video-player.sh doesn't repaint the on-screen controls, therefore it  requires the mouse to be moved over the controls for repainting to occur.

7. To test VPU using the gstreamer1.0 plugin, I have included a script thats launches playbin:

    gst-1.0-playbin.sh <media file>

Note: if you attempt to close the window early, playbin continues to runs and only the display output is halted. To correctly close early kill the playbin process.

8. I encountered problems with xfce-mixer not correctly detecting multiple sound cards (eg on the Utilte Pro). To test sound is correctly configured I have included a sample wav (paino2.wav) file. To test sound output run:

   aplay paino2.wav

If you don't hear sound, run 'aplay -l' to list the sound devices detected by alsa. To run aplay against the correct device you can pass the sound card and device number listed by 'aplay -l' to the aplay command, example below (2 is card and 0 is the device):

   aplay hw:2,0 piano2.wav

To set the default sound device you can create the following entries in/etc/asound.conf. Replacing 'card' and 'device' with the correct values.

  defaults.Master.card 2
  defaults.Master.device 0
  defaults.pcm.card 2
  defaults.pcm.device 0
  defaults.ctl.card 2
  defaults.ctl.device 0


9. As per my last blog because we are replacing the mesa libraries with Vivante equivalents, any package updates for the mesa libraries will break GPU acceleration. If you plan to compile natively, this potentially may result in compilation breakages which rely on the mesa headers. As a work around you  could reinstall the mesa packages to obtain the correct headers, compile and then move the mesa shared libraries out the way again.

10. For root access password is same as user.

11. To revert to a console boot, you can disable lightdm from auto starting by:

   update-rc.d lightdm disable


If you require more help try the irc channel imx6-dev (was know as imx6-dongle).

I.MX6 Wayland/Weston (3.10.17_beta)

$
0
0
Among the many items on my to do list was to determine how complete the Wayland support was in latest 3.10.17_beta BSP release. A complete description of Wayland and Weston can be found here.

In short, Weston is a reference implementation of a Wayland compositor. In order to run Weston we need to build Wayland and Weston, as a starting point I found some outdated instructions here. From these instructions and after further investigation it became clear that the freescale Weston implementation relies on a framebuffer backend (compositor-fbdev.c). The wayland libraries seem to be very similar to their framebuffer counterparts and support double and triple buffering.There are 2 possible configurations for the framebuffer backend:
  1. A custom render (GAL2D) which use the GC320 GPU + fbdev. There's a couple of patches that implement the render (gal2d-renderer.c)
  2. Use the built-in gl_render which uses EGL/GLES for composition.
I chose to use the gl_render so that the EGL sample(s) could be run. To run weston the following packages need to built (instructions for native compilation are below).

  1. wayland 
  2. ibxkbcommon 
  3. pixman
  4. cairo
  5. weston
The packages were built for deployment on the debian jessi rootfs which was upgraded to the 3.10.17_beta BSP along a 3.10.17 kernel. Wayland/Weston were built from the master branch which currently are at version 1.4. Here is a short video demonstrating a number of Weston examples running on a UDOO (this was the most convenient device at hand to test with).


Although the video demonstrates a number of Weston examples running well, I encountered high CPU when invoking the  'weston-smoke' example which tests SHM buffer sharing. Furthermore I encountered a few lockups what's unclear is whether these are a result of using the master branches of the deployed packages or a problem within fsl wayland libraries. Given the 3.10.17 BSP is in beta it should be treated as so.

Building and deploying Wayland/Weston

Ensure you have deployed the 3.10.17 Vivante gpu headers and libaries,  ensure symbolic links point to '-wl' libraries eg:

/usr/lib/libVIVANTE.so -> libVIVANTE-wl.so
/usr/lib/libGAL.so -> libGAL-wl.so
/usr/lib/libEGL.so -> libEGL-wl.so
/usr/lib/libEGL.so.1.0 -> libEGL-wl.so


You may need to pull in addition packages to successfully complete compilation. Building cairo/pixman may require pulling in X11 packages. As mentioned these steps were completed on my debian jessi rootfs and should be transferable to other distros.

Build Wayland

export WLD=/usr
git clone git://anongit.freedesktop.org/wayland/wayland
cd wayland
./autogen.sh --prefix=$WLD --disable-documentation
make && make install
cd ..


Build libxkbcommon

git clone git://github.com/xkbcommon/libxkbcommon
cd libxkbcommon
./autogen.sh
make && make install 

cd ..

Build cairo

git clone git://anongit.freedesktop.org/cairo
cd cairo
./autogen.sh glesv2_CFLAGS="-DLINUX=1 -DEGL_API_FB -DEGL_API_WL" --enable-glesv2 --disable-xcb
make && make install
cd ..

Build pixman

git clone git://anongit.freedesktop.org/pixman
cd pixman
./autogen.sh
make && make install
cd .
.

Build Weston

git clone git://anongit.freedesktop.org/wayland/weston
cd weston


We need patch compositor-fbdev.c so that a EGL handle is retrieved from the framebuffer so that gl_render can use it. See my patch http://pastebin.com/x5gumsye

Now export these variables and build

export LDFLAGS="-lwayland-server -lwayland-client -lwayland-server -lwayland-cursor -lpixman-1"
export COMPOSITOR_LIBS="-lGLESv2 -lEGL -lGAL -lwayland-server -lxkbcommon -lpixman-1"
export COMPOSITOR_CFLAGS="-I $WLD/include -I $WLD/include/pixman-1 -L$SDK_DIR/drivers -DLINUX=1 -DEGL_API_FB -DEGL_API_WL"
export CLIENT_CFLAGS="-I $WLD/include -I $WLD/include/cairo -I $WLD/include/pixman-1"
export CLIENT_LIBS="-lGLESv2 -lEGL -lwayland-client -lwayland-cursor -lxkbcommon -lcairo"
export SIMPLE_EGL_CLIENT_CFLAGS="-DLINUX=1 -DEGL_API_FB -DEGL_API_WL -I $WLD/include"
export SIMPLE_EGL_CLIENT_LIBS="-lGLESv2 -lEGL -lwayland-client -lwayland-cursor"
export IMAGE_LIBS="-lwayland-cursor"
export WESTON_INFO_LIBS="-lwayland-client"
export EGL_TESTS_CFLAGS="-DLINUX=1 -DEGL_API_FB -DEGL_API_WL -I $WLD/include"
export EGL_TESTS_LIBS="-lEGL -lGLESv2 -lwayland-egl -lwayland-client -lcairo"
export TEST_CLIENT_LIBS="-lwayland-client -lcairo"


./autogen.sh --prefix=$WLD --disable-setuid-install --disable-x11-compositor --disable-drm-compositor --disable-rpi-compositor --disable-wayland-compositor --disable-weston-launch --disable-libunwind --disable-xwayland --disable-xwayland-test WESTON_NATIVE_BACKEND="fbdev-backend.so"

make && make install

Before we launch weston, edit the default weston.ini and comment out or remove the following lines (there no gnome terminal or chrome to launch):

[launcher]
icon=/usr/share/icons/gnome/24x24/apps/utilities-terminal.png
path=/usr/bin/gnome-terminal


[launcher]
icon=/usr/share/icons/hicolor/24x24/apps/google-chrome.png
path=/usr/bin/google-chrome


Lets enable double buffering (can also set triple buffering):

export FB_MULTI_BUFFER=2

To launch weston, asumming your are runnnig as root user ( and output to a log file):

export XDG_RUNTIME_DIR=/tmp; weston --log=weston.log --use-gl

If weston fails to launch, check the log file weston.log.

The following samples ran without problems:

weston-clickdot
weston-cliptest
weston-dnd
weston-editor
weston-flower
weston-scaler
weston-simple-egl
weston-simple-shm
weston-stacking

I.MX6 Debian Jessie (GPU/VPU) 3.10.17_beta

$
0
0
Following on from the previous jessie rootfs, this is an updated version with the 3.10.17_beta BSP libraries deployed. It should work on most i.mx6 devices providing you have a valid uboot and kernel. Furthermore you can also use it as a test bed for Wayland/Weston development as per my last post.

One of the primary changes in the beta BSP is the inclusion of xrandr support within the X driver. Unfortunately the driver is partially functioning, for example I couldn't get it change resolution without restarting the X server. Another change is the Vivante driver are updated to 4.6.9p13 (see).

As with the previous rootfs:

1. Download and extract the tar file onto your boot media
2. Deploy a compatible uboot on your boot media
3. Deploy 3.10.17 beta kernel (or a kernel with the 4.6.9p13 patches merged) on your boot media
4. If required enable serial console support in /etc/inittab (see)
5. Setup networking as required.

By default the system boots to console mode, refer to the previous post on how to verify the rootfs is functioning correctly.

I've included some scripts to allow switching between the fb, x11 and wayland vivante libraries, these are located in /root and self explanatory.

/root/switch_to_wl.sh
/root/switch_to_fb.sh
/root/switch_to_x11.sh


If you choose to use x11 by default XFCE (lightdm) is disabled. To launch it:

service lightdm start

If you have no screen output (assuming HDMI) then (because of the xrandr feature) you will to have to manually configure the screen resolution in xorg.conf. To do this un-comment the screen SubSection and change to the correct resolution.

    SubSection     "Display"
        Modes      "U:1280x720p-60"
    EndSubSection 


If can't find the correct resolution then check the last output from /var/log/xorg.0.log. The current the resolution chosen by the X driver will be shown by the following statements:

[    38.607] (II) VIVANTE(0): Using user preference for initial modes
[    38.608] (II) VIVANTE(0): Output DISP3 BG using initial mode U:1280x720p-60
[    38.768] (II) VIVANTE(0): imxDisplayPreInit: virtual set 1280 x 720, display


The log file may also list all the possible modes available, it does this by reading EDID (assuming HDMI) which seems to be a hit or miss affair depending on your TV/monitor. For example may see something similar to this: 

[    35.223] (II) VIVANTE(0): Modeline "U:720x576p-50"x0.0   27.00  720 732 796 864  576 581 586 625 -hsync -vsync -csync (31.2 kHz
e)
[    35.224] (II) VIVANTE(0): Modeline "U:1920x1080p-60"x0.0  148.50  1920 2008 2052 2200  1080 1084 1089 1125 +hsync +vsync -csync
(67.5 kHz e)


Replace the Modes value with correct one from xorg.0.log and restart lightdm. For example:

Modes      "U:1920x1080p-60"

I.MX6 - gstreamer-imx

$
0
0
gstreamer-imx is set of gstreamer 1.0 imx6 video plugins principally developed by Carlos Giani a.k.a dv_ (great work!). Once stable these plugins "hopefully" will supersede the Freescale BSP gstreamers 0.10 plugins which are showing their age given that gstreamer 0.10 is longer maintained.

The main driver for this work was to get a usb webcam streaming via these plugins this will be covered in the next post. In meantime below are build instructions for deploying the latest code to the debian rootfs if you fancy experimenting.  I'm finding the debian jessie build useful to jump start prototype development on the imx6 mainly due to the availability of prebuilt packages.

Here is a short video demonstrating the use of color key along with the imxipusink to hide/view video within XFCE. The video only appears for the color key 'black' hence it is visible in the terminal windows and menu. The test device was a AR6MXQ board provide by BCM Advanced Research. As a designer/provider of industrial motherboards BCM have done a good job with their first feature rich ARM development board.


The current debian rootfs already includes an older build of the gstreamer-imx plugins. Upgrading these to a newer release is fairly trivial, you can build the latest sources natively on debian as follows:

1. Remove the existing plugins

 rm /usr/lib/arm-linux-gnueabihf/gstreamer-1.0/libgstimxipu.so 
rm /usr/lib/arm-linux-gnueabihf/gstreamer-1.0/libgstimxvpu.so
rm /usr/lib/arm-linux-gnueabihf/gstreamer-1.0/libgstimxeglvivsink.so

rm /usr/lib/libgstimxcommon.so
rm /usr/lib/libgstimxcommon.so.0
rm /usr/lib/libgstimxcommon.so.0.9.1

2. Build lastest sources

 git clone git://github.com/Freescale/gstreamer-imx.git  
cd gstreamer-imx
./waf configure --prefix=usr --kernel-headers=/usr/include
./waf
./waf install

3. Deploy plugins

 cp usr/lib/gstreamer-1.0/libgstimxipu.so /usr/lib/arm-linux-gnueabihf/gstreamer-1.0  
cp usr/lib/gstreamer-1.0/libgstimxvpu.so /usr/lib/arm-linux-gnueabihf/gstreamer-1.0
cp usr/lib/gstreamer-1.0/libgstimxeglvivsink.so /usr/lib/arm-linux-gnueabihf/gstreamer-1.0
cp usr/lib/gstreamer-1.0/libgstimxv4l2src.so /usr/lib/arm-linux-gnueabihf/gstreamer-1.0
cp usr/lib/libgstimxcommon.so.0.9.5 /usr/lib
cd /usr/lib
ln -s libgstimxcommon.so.0.9.5 libgstimxcommon.so.0
ln -s libgstimxcommon.so.0.9.5 libgstimxcommon.so

4. Reboot

5. Verify the plugins are present

 root@debian-imx6:~# gst-inspect-1.0 | grep imx  
imxipu: imxipuvideotransform: Freescale IPU video transform element
imxipu: imxipusink: Freescale IPU video sink
imxvpu: imxvpudec: Freescale VPU video decoder
imxvpu: imxvpuenc_h263: Freescale VPU h.263 video encoder
imxvpu: imxvpuenc_h264: Freescale VPU h.264 video encoder
imxvpu: imxvpuenc_mpeg4: Freescale VPU MPEG-4 video encoder
imxvpu: imxvpuenc_mjpeg: Freescale VPU motion JPEG video encoder
imxeglvivsink: imxeglvivsink: Freescale EGL video sink
imxv4l2src: imxv4l2src: V4L2 CSI Video Source

6. Test video playback (under X11)

 gst-launch-1.0 playbin uri=file://<video file> video-sink=imxeglvivsink  

Unfortunately the elements/sinks aren't documented so you may need to refer to the source code to determine features or properties. There is also a new plugin for CSI camera sources (imxv4l2src) provided by  Philip Craig.

I.MX6 - gstreamer-imx and usb webcam support

$
0
0
Following on from my previous post about gstreamer-imx, this blog covers hooking a usb webcam using the gstreamer-imx plugins. It starts with creating simple pipeline for screen output, next is a pipeline for time lapse video recording. We then progress to streaming to VLC and finally implementing a simple rtsp server. Below is video demonstrating a simple RTSP server running on a AR6MXQ streaming to VLC. The webcam is pointing at the screen and streams the output (720p @10fps). We launch a VLC client window which is located in the lower right side of the same screen (unfortunately this causes an echo effect). As you will see any activity on the screen is streamed to the VLC client window (lower right) albeit with a delay.


The webcam in question was a microsoft HD-3000 which in theory is capable of 720p at 30fps. As with most webcams (which don't encode H264) it outputs YUYV (YUY2) and more importantly MJPEG. On linux you can easily determine what your webcam capabilities are by launching  v4l2-ctl, eg:

v4l2-ctl --list-formats-ext

This post provides a guide to what is possible with a gstreamer-imx plugins and the examples provided should not be treated as production ready. I'm assuming the examples will work on other usb webcams and or potentially other v4l2 devices. However the examples may require alterations depending on your webcam and it's capabilities, therefore background reading on gstreamer is recommended.

Testing was conducted on debian jessie and the target device was a AR6MXQ board provided by BCM Advanced Research. The examples should run on most imx6 devices as there is no device specific dependencies.

While testing with the HD-3000, the webcam  occasionally stop sending a stream if I configured the wrong resolution. The workaround was to unplug the device or reset the usb port  (replace '1-1.3' with the correct usb host and port id for your webcam) eg :

echo 1-1.3 > /sys/bus/usb/drivers/usb/unbind
echo 1-1.3 > /sys/bus/usb/drivers/usb/bind


Output to screen


Now back to the webcam, first step was getting output displayed to the screen. This requires reading the v4l2 source and converting the input so that is compatible with imxeglvivsink. Initial testing revealed decoding MPEG from the webcam performed significantly better than decoding YUY2. Another issue encountered (thanks to Carlos) was imxvpudec outputting Y42B something imeglvivsink currently can't cope with hence the inclusion of imxipuvideotransform element. So here is the final pipeline (webcam input is MPEG 720p at 30fps) :


gst-launch-1.0 v4l2src ! 'image/jpeg,width=1280,height=720,framerate=30/1' ! im
xvpudec ! imxipuvideotransform ! imxeglvivsink sync=false


CPU usage for the above was around 10%, while for YUY2 (720p at 10fps) it rises to 25% with this pipeline:

gst-launch-1.0 v4l2src ! 'video/x-raw,width=1280,height=720,framerate=10/1' ! imxipuvideotransform ! imxeglvivsink sync=false


Simple time lapsed video recording


Now lets implement a simple timelapsed video recorder that outputs to file and screen. I limited to the input MPEG stream to 10fps, reduced the bitrate  and encoded as h264 to reduce the output file size. Additional CPU load occurs due to the inclusion of the clockoverlay element, without the element it is difficult to know when the recording was taken.  Without this clockoverlay element CPU load is < 10%.

gst-launch-1.0 v4l2src ! 'image/jpeg,width=1280,height=720,framerate=10/1' ! imx
vpudec ! imxipuvideotransform ! clockoverlay time-format="%Y/%m/%d %H:%M:%S" ! tee name=splitter ! queue ! imxvpuenc_h264 bitrate=1024 ! filesink location=test .mp4 splitter. ! queue ! imxeglvivsink sync=false


The above pipeline generates approximately 400Mb per hour so probably not practical for production use.

Streaming to VLC


To enable streaming to VLC we need to create a 'sdp' file, this instruction VLC to act as a rtp server, below are the contents of the file:

v=0
s=GStreamer
m=video 5000 RTP/AVP 96
c=IN IP4 127.0.0.1
a=type:broadcast
a=rtpmap:96 H264/90000
a=fmtp:96


Save the contents to file eg 'imx6.sdp' and launch VLC,  because there is no h/w acceleration for VLC on the imx6, VLC was running on a PC :

vlc --no-audio imx6.sdp

On the imx6, we are a rtp client submitting h264 payloads to the VLC server (note the inclusion of the host/ip address of the PC) :

gst-launch-1.0 -v v4l2src ! 'image/jpeg,width=1280,height=720,framerate=10/1' !
imxvpudec ! imxipuvideotransform ! imxvpuenc_h264 bitrate=1024 ! rtph264pay ! udpsink host=<host/ip of PC> port=5000


Simple RTSP server


And lastly, lets try running an rtp server. Fortunately there is an additional gstreamer plugin (gst-rtsp-server) with rtp support that includes an example test server. The downside is that it needs to be built from sources. You will need to checkout the 1.1.90 tag and build (similar to gstreamer-imx). Once built we can launch the example test server and pass it a pipeline similar to that used when outputting to screen (you need to export the library path so that libgstrtspserver-1.0.so is found) eg:

export ./gst-rtsp-server/gst/rtsp-server/.libs
cd ./gst-rtsp-server/examples/.libs/

./test-launch '(v4l2src ! 'image/jpeg,width=1280,height=720,framerate=10/1' !imxvpudec ! imxipuvideotransform ! imxvpuenc_h264 ! rtph264pay name=pay0 pt=96 )' 


The test server listens on port 8554 therefore the rtsp URL is

rtsp://<host/ip of imx6>:8554/test

You can test by launching VLC and opening a 'Network Stream' to the URL. While streaming the CPU load on the imx6 hovered around 60%. Given this is example code it should be possible to optimise the pipeline/code to bring down this figure.

I.MX6 Debian Jessie (GPU/VPU) 3.10.17_GA

$
0
0
Given that we a finally have a GA release of the 3.10.17 kernel and BSP from Freescale (although there also is a 3.10.31 alpha release in the pipleline). Here is an upgraded the Debian Jessie rootfs. You can download it from here and my previous 2 posts (here and here) cover installation and configurations step. Furthermore you require a kernel based on this release with the appropriate dts file for your i.mx6 device. This is a barebone rootfs with gpu/vpu support  and as previously stated I use this rootfs mainly for development. I haven't observed any major changes since the 3.10.17 beta release.

I.MX6 Developing with WebGL

$
0
0
On the new features in BSP 3.10.17 was support for WebGL. In a nutshell WebGL is javascript API supporting 3D and 2D graphics rendering, more about WebGL can be found here. WebGL is based on Open GL ES 2.0.

WebGL support opens up the possibility of developing and running graphical web based application on the i.mx6 within a browser. Furthermore there's also the possibility of the deploying a LAMP stack to serve the application from the i.mx6.  This opens up the possibility of developing simple games, kiosk applications, interaction user manuals/instructions and signage displays, etc..

To give you a taste of what is possible with the current WebGL implementation, I've put together a number of short videos that run existing WebGL demos/applications. These were run on lightweight Debian rootfs with Chromium browser (under X) on an i.mx6q board as part of a prototyping exercise. Chromium has been tweaked to maximize performance and the screen resolution was 720p (1280x720. Beware that not all WebGL application will run, some will fail because the Vivante libraries currently lack the 'Float Textures' extensions, others because the GPU is not powerful enough to give a decent FPS rate. Apologies for the quality of the videos. I'd advise that a i.mx6 quad processor is used to run WebGL as the examples consume 25-35% CPU under load.

The first video which also sums up what can be done on the i.mx6 with WebGL is the 'Lego build Chrome' demo. This application allows the creation of a Lego structure.


three.js is a javascript library which makes WebGL easier, here are some WebGL/CSS 3D examples which play nicely.


babylon.js is a 3D engine based on WebGL and javascript. The 'Create Your Own Shader' demo allows online editing of shaders.


CopperCube is an editor for creating 3D application, this is the 'Backyard Demo'.


Finally the "undulating-monkey" from aerotwist.


i.MX6 Efficient font rendering and smoothing scrolling

$
0
0
Here is a short video demonstrating efficient font rendering and smoothing scrolling using OpenGL ES.


You may be forced to adopt this approach if your finding alternatives routes such as Qt5, HTML 5 or GTK+/Cario aren't giving you satisfactory results. The downside is that since you are starting from a low base (this a very low level implementation) it requires a far amount of development effort. On the positive side the code can be made to be as efficient as possible (to reduce power consumption/heat) and can be highly customised, in the above demo we control the screen from a remote PC.

Intel BayTrail - J1900

$
0
0
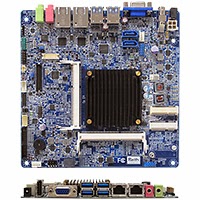
On of the main challengers to the current generation of ARM SOCs are the Intel BayTrail range. For me the interesting part of the family are E38XX (atom) and J1X00 (celeron) processors which boast  7-10W TDP. In this article I will cover the some initial performance metrics against the J1900 with the Intel Linux software stack. My test device was a low profile MX1900J industrial mini-itx board produced by BCM Advanced Research.


What's nice about the MX1900J :

1. Low profile with a heat sink that is approximately 15mm high.

2. On board DC power jack (12v) hence no need for a separate DC to DC converter board.

3. 4 x USB 3.0

4. Inclusion of LVDS and GPIO support.

5. Dual Ethernet NIC's

What's different about this board is the inclusion of a Display Port connector instead of HDMI along with VGA output. The BIOS has UEFI 64 and legacy support.

From an application developers view point there's quite a few advantages with the x86 platform. Firstly there is the vast amount of existing software that can run of the 'out of the box' or with minimal changes. Another is the shorter ramp up time between set up/configuration of the BSP/kernel/rootfs to actual application development. Lastly I would also argue that Intel do seem to devote a fair amount of resources to open source development therefore the underlying BSP have the potential to keep up with the latest trends (eg Chromium-ozone, Wayland, Tzien).

The J1900 GPU core supports Intel HD 4000 graphics and there are two linux graphics drivers available for the J1900. The lesser known of the two is the EMGD driver (Embedded Media and Graphics Driver) which are closed sourced binaries that are accessible through user space libraries eg libdrm, mesa and libva. The EMGD documentation targets these drivers for Fedora 18 against  Kernel 3.8 and xorg 13.1. Having previously used the EMGD drivers they can be ported to other Linux distros however problems may arise when upgrading or moving to newer  distro versions, where ABI breakages prevent this happening or cause stability issues. Intel prefer EMGD as they claim better 3D performance due to the Unified 3D (UFO) Driver.

The alternative to EMGD is the open source (Intel Linux Graphics) driver which can have better support for later kernels and hence usable on a later Linux distro. The downside may be a slight drop in overall performance and possibly stability. I chose to deploy the open source drivers against a very lightweight Ubuntu 14.04 image. The drivers provides OpenGL 3.3 and OpenGL ES 3.0.

The J1900 GPU core has 4 EU (Execution Units) combined with a maximum GPU frequency of 854Mhz. To given you have ideal of where the J1900 fits in the 'food chain' lets compare the FPS (frame per second) rates of running the WebGL Aquarium Demo on a imx6q, J1900 and an older 1037u celeron.


Number of Fish
1501005001000
PlatformScreen ResolutionFrames Per Second
i.mx6q1280x72087755
J19001680x10504848474033
1037u1680x10506060606060

First lets be clear the above results are to be interpreted as a relative comparison. It should not be used as a primary marker for judging one platform to be superior to the other. Each platform has its merits based on a number of factors.  The i.mx6q as expected struggles (even at the lower resolution the rendering was not smooth) mainly due to the lower spec CPU/GPU core , an inefficient X driver and possibly some inefficient code paths in Chromium.  The older 1037u dual core celeron performs well due to the higher GPU frequency 1HGz and 6 EU, the trade off is a higher thermal output at 17W. What I couldn't easily account for was the drop off in the FPS rate at 1000 for the J1900. Below are the results from the BabylonJS train demo which is an intensive WebGL application supporting multiple camera angles, CAM_TRAIN being my favourite. What's interesting is that the FPS rate did not deviate when forcing Chromium to use EGL/GLES instead of OpenGL for the J1900.


PlatformScreen ResolutionFrames per second
J19001680x105013
1037u1680x105024

Video playback is available through VAAPI plus libav with h.264/mpeg-2  hardware accelerated encoding/decoding. mplayer and gstreamer 1.0 support is readily available. CPU usage for decoding Big Buck Bunny at 1080p (H.264) was around 13% both in mplayer and using a simple gstreamer 1.0 pipeline. Decoding a 720p usb webcam at 30fps (YUY2) with the output encoded (H.264) to file and displayed to screen using a simple gstreamer pipeline resulted in 15% CPU usage.

Given the recent interest in HTML5 development for embedded platforms I  deployed a development build of Chromium (build 39). Chromium is fast becoming the web container of choice given the recent adoption of its engine in QT (QtWebEngine). HTML5test reported a healthy score of 512 out of 555 against Chromium.  A test HTML5 page with two embedded video files (playing concurrently) along a with a bunch of images (png) and static text ran without hiccup consuming 20% cpu. I briefly ran some demo HTML5 widgets from  zebra , webix and Kendo UI  again these ran smoothly. What should be possible with this platform is the ability to create a HTML5 GUI interface that could drive the rest of the application hosted on the same machine.

On the whole the results look very encouraging and the J1900 seems to offer a good trade off for a fan less solution with decent performance. Furthermore it should provide a relatively smooth route for application development. The main consideration is form factor and it is possible to find the J1900 in 3.5" SBC or Q7 form.

RK3288 - Firefly development board

$
0
0
I received this board just over a month ago from the Firefly team and have been keen to assess it development capabilities given its hosts a quad core Cortex A17 (or technically a Cortex A12) processor. 


On board is a Rockchip RK3288 processor which on initial glance has a pretty decent specification:

  1. 4Kx2K H.264/H.265(10-bit) video decoder
  2. 1080p H.264 video encoder
  3. Up to 3840X2160 display resolution
  4. 4Kx2K@60fpsHDMI2.0
  5. eDP 4Kx2K@30fps
  6. According to Rockchip the GPU core is listed as a Mali-T764 GPU although it's reported as a Mali-T760 by the Mali drivers.
  7. Ethernet Controller Supporting 10/100/1000-Mbps 

Given the above I think it is import to clarify what 4Kx2K actually means and the clue is in point 3. Having spent many hours debugging the kernel driver display code it turns out the RK3288 has 2 display controllers know as VOP_BIG and VOP_LIT (I presume for little). VOP_BIG support a maximum resolution of 3840x2160 which equates to 4K UHD (Ultra high definition television) and for VOP_LIT its 2560x1600 (WQXGA). Each controller can be bound to a display interface eg HDMI, LVDS or eDP (sadly missing on the firefly).  If you define 4Kx2K as 4096x2160 also know as DCI 4K then the definitions can be misleading. The numbers also align with H264/VP8/MVC decoding which max at 2160p@24fps (3840x2160), although the HEVC(H265) decoder contradicts this by  supporting 4k@60FPS (4096x2304). What is also interesting is the image processing engine can up scale to 3x input, which would imply 720p can be up scaled to 4K UHD.

The Firefly seems to be based on a Android TV box reference design and it could be argued that its targeted as an Android centric development board. The noticeable peripherals are:

1. VGA support + HDMI
2. On board microphone
3. Wifi Connector (RF Connector SMA Female)
4. IR Sensor
5. eMMC 16Gb

Firefly supply a pre-built dual boot image (on eMMC) that offers Android 4.4
and Ubuntu 14.04.

Android 4.4


Firefly supply the Android SDK sources so that customised images can be built from source. What is nice is that the Android Studio integrates well with the Firefly which eases development of Android Apps especially for newcomers. Furthermore the App can be remote debugged while running on the Firefly. I  suggest that you sign your App with the platform key from the SDK to ease integration when remote debugging. One pitfall to bear in mind is that Android 4.4 implements selinux so you may find accessing I/O via sysfs (eg GPIO) from your Android App is severely restricted. 

Ubuntu 14.04


The Ubuntu image uses a patched version of the Android kernel and unfortunately has no support for GPU/VUP acceleration.

Linux Support


Historically many ARM SOC vendors have side stepped any request for providing meaningful Linux support and instead rely on the developer community to progress this as far as they can. Unfortunately the situation is normally exacerbated by the lack co-operation for GPU/VPU support with SOC vendor. What's clearly not recognised by ARM is that this fragmentation is clearly benefiting Intel with their latest lower power SOC's having far superior out of box Linux support.

As of today I would argue the RK3288 falls midway between no and full Linux support. The reason for this is Rockchips effort to develop a Chromebook device, if you examine the Chromium OS source tree will find numerous patches submitted from Rockchip

So the question becomes can we make use of that source tree? Well my initial aim was to get a minimal kernel booting and ideally test if GPU support was possible. The video below shows the progress made after numerous weeks of attempting to bring a workable kernel. In the video I launch Openbox under X and run es2gear,glmark-es2 and some WebGL samples in Chromium.


Although the video may seem impressive the only GPU acceleration available is through EGL/GLES hence the WebGL examples are accelerated. What is important to bear in mind is that the xf86-video-armsoc driver lacks 2D support for Rockchip therefore this still is fair amount of software rendering in X11 plus I implemented workarounds for broken code. Furthermore performance isn't particular spectacular, es2gear & glmark-es2 numbers are here. Unfortunately I haven't had the time to investigate the cause(s) however further progress may be hinder by the lack of newer Mali drivers from Rockchip/ARM.

For those of you expecting a future Rockchip Chromium OS image to work on an existing RK3288 device you may be disappointed unfortunately the hardware differences make this a slim possibility.

IOT - ESP8266 (ESP-201) + CC1110 (XRF)

$
0
0
Overall past few months there has been a huge amount of interest in the ESP8266 which offers a low cost Serial to WIFI solution. The introduction of the ESP8266 by Espressif coincidences with the increased hype of IOT (Internet of Things) as the next major emerging technology. Realistically IOT has been around for a decades in different disguises so the concept isn't new. I'm guessing the renewed interested is partly because sensors, processors and networks are dirt cheap and wireless technology is ubiquitous. Coupled with the rise of the maker culture it now means the cost of entry is low for connecting devices.

The are numerous modules available that host a ESP8266 and these can be found for a few dollars, however most have limited pins broken out, UART plus some GPIO. In my opinion a better option is the EPS-201 which has a larger number of pins broken out and an external U.FL antenna connector (IPX antenna). With a slight modification the module can be made breadboard compatible.


The main drawbacks with the ESP-201 are:

1. Lack of CE/FCC compliance (the ESP8266 is not the module).
2. The pin marking are on the underside of PCB therefore not visible when sitting in a breadboard.
3. The UART pins protrude on the underside of the PCB which means it can't be plugged into a breadboard without bending these pins at a right angle (as shown) or ideally de-soldering the pins and re-attaching the correct way round.


To evaluate the ESP8266 I chose to integrate it with an existing wireless (868Mhz) set up which is used for monitoring a number of sensors as well providing periodic temperature readings.  The existing radio set up uses Ciseco's XRF  which hosts TI's low power CC1110 transceiver. It runs custom developed firmware that is controlled through one of the two CC1110 UART ports. The plan was extended the firmware so that CC1110 could be controlled over TCP by running a socket server on the ESP8266. Compared to the ESP8266 the CC1110 has a wealth of reference documentation which increases the options for interfacing with other devices in addition to easing the programming burden. The main drawback with the CC1110 is the cost of the development tools although it possible to use SDCC (Small Device C Compiler) as an alternative.

Initially I was hoping to use I2C/SPI as the interface between the CC1110 and the ESP8266. However due to the CC1110 not supporting hardware I2C and coupled with the fact that I had just a few free I/O pins remaining I was left with one option that was to use the second UART port.


Espressif provide an SDK that can be flashed to the ESP8266 which provides a simple AT command style interface to program the device. Note, the SDK is continually being updated so check for later releases. One quirk with the ESP-201 is that is IO15 has to be grounded for the device to function. To flash the device IO00 has to be grounded. Instructions for SDK set up on Linux can be found here. To flash the AT firmware for SDK 1.0 on Linux we can issue the following command:

esptool.py write_flash 0x00000 boot_v1.2.bin 0x01000 at/user1.512.new.bin 0x3e000 blank.bin 0x7e000 blank.bin

After flashing the ESP-201 the bulk of the coding was done on the CC1110 which mainly entailed sending AT commands to the ESP-201 to initial a connection to the,  launch a socket server and send updates from the sensors. The sequence of AT commands was similar to this:

AT+RST
ATE0
AT+CWMODE=1
AT+CWJAP="SSID","Your Password"
AT+CIPMUX=1
AT+CIPSERVER=1,80

After coding up the AT commands on the CC1110 I could test by launching a telnet session on port 80 to the ip address allocated via DHCP from the AP. Output sensor data from both the CC1110 UART port and ESP-201 is shown below.


Coding the above highlighted a number of pitfalls with the AT firmware and hardware.

  • It can be tedious to parse the verbose and inconsistent responses returned by the ESP8266 to AT commands. To tone down the verbose responses  I used ATE0, however its not permanent so needs to be sent on a reset.
  • Resetting (AT+RST) or joining an access point (AT+CWJAP) can be slow therefore you need to carefully select relevant time out values.
  • STA mode (AT+CWMODE=1) can silently disconnect after a random time.
  • The ESP8266 isn't particularly well suited as a battery powered device because it can consume up to 300mA.

It is possible to write your own firmware instead of using the pre-built AT firmware, which in my opinion is a better option. Espressif provide a set of closed sourced C libraries which offers a finer level of control compared to the AT firmware. Having  spent a considerable amount of time writing custom firmware to interface to the CC1110, here's my findings:

  • Although there is a second UART available on the ESP8266, in most circumstances only the TX pin available (primary use is for debugging) because the RX pin is used as part of the SPI interface for the flash memory.
  • There is no in-circuit debugging option, your reliant on sending tracing output to the UART port or somewhere else.
  • Although SSL support is provided, it seems to be a hit and miss affair between SDK versions.
  •  The API is closed source, so your reliant on Espressif providing regular updates for new features or bug fixes.
  • No hardware encryption.
  • Not all I/O features are available eg RTC or I2C.

Given the amount of attention the ESP8266 has received it is fair to say it does offer a low cost and rapid approach to prototyping a WIFI solution for existing hardware or for a new application. However you could argue that most of the attention has come from hobbyists and not commercial ventures. In my opinion I think it is worth exploring other WIFI SOC's that coming to the market this year such as:


Furthermore it still not clear whether WIFI (2.4GHz or 5GHz) is the ideal medium for wireless IOT as the wake up and connect times aren't particular quick. The other point to make is that cost of the some of the above SOCs can make them overlap with traditional networking SOC which are used in low cost router boards. One example is the AR9331 which supports a full Linux stack and can be used for video streaming or complex routing something the WIFI SOC's may find hard to achieve.

Viewing all 72 articles
Browse latest View live